Mastering The Art Of Butterfly Drawing: A Step-by-Step Guide For All Skill Levels
Butterflies, with their delicate wings and vibrant colors, have captivated artists and nature lovers for centuries. Their intricate patterns and graceful flight make them a truly inspiring subject for drawing. Whether you're a complete beginner looking to pick up a new hobby or an experienced artist wanting to refine your skills, learning how to draw a butterfly is a fantastic way to improve your drawing abilities and express your creativity.
In this comprehensive guide, we'll walk you through the process of drawing a beautiful butterfly, focusing on an easy step-by-step approach that's perfect for all ages and skill levels. We'll primarily focus on how to draw a Monarch butterfly, known for its striking orange and black patterns, but the methods we discuss can easily be modified to draw any other type of butterfly you admire. Grab a piece of paper, a pencil, and get ready to have some fun!
Getting Started: What You'll Need
One of the best things about drawing is how little specialized equipment it requires. For this butterfly drawing tutorial, you'll only need a few basic items:
- Paper: Any standard drawing paper will do.
- Pencils: A regular graphite pencil for sketching (HB or 2B are good choices) and an eraser.
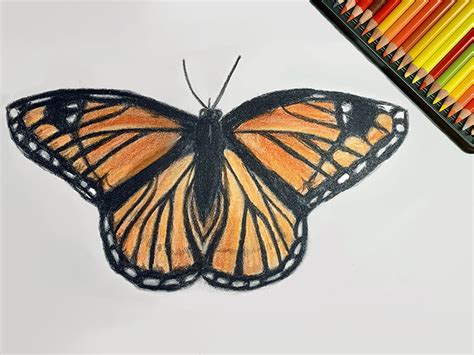
- Optional: Colored pencils, markers, or watercolors if you wish to add color to your finished drawing. For detailed butterfly wings, colored pencils and graphite can really bring out the intricate patterns.
This drawing tutorial is great for beginners because it doesn’t require any specialized equipment, making it accessible to everyone.
The Foundation: Breaking Down the Butterfly Drawing Process
Drawing a detailed butterfly might seem daunting at first, especially with their intricate patterns. However, by breaking it down into simple, manageable steps, you'll find it's quite straightforward. We'll guide you through each stage, right from scratch.
Step 1: The Basic Body Structure
Every great drawing starts with a solid foundation. For our butterfly, we'll begin with its core anatomy:
- Head: One way to draw a butterfly is by starting with a small circle for the head. This will be the topmost part of your butterfly.
- Eyes: On either side of the head, draw two small ovals for the eyes. These don't need to be perfectly round, just enough to suggest the eyes.
- Antennae: Then, draw 2 long lines extended from the head with very small ovals at the end for the antennae tips. These add character to your butterfly.
- Body (Thorax & Abdomen): Below the head, draw an elongated oval or a series of connected oval-like segments for the butterfly's body. The segment closest to the head is the thorax, and the longer, tapering part is the abdomen. Keep it simple for now; we'll add details later.
This initial sketch should be light, as these are just guidelines that you'll refine later.
Step 2: Sketching the Wings
The wings are arguably the most striking feature of a butterfly. They are also remarkably symmetrical, which is a key aspect to remember when drawing them. Today I’m sharing how to draw a butterfly in two different ways: a front facing monarch butterfly and a side view of the butterfly flying. For this guide, we'll focus on a front-facing view, which showcases the full beauty of both sets of wings.
- Upper Wings: From the sides of the thorax (the upper part of the body), lightly sketch two large, roughly triangular or oval shapes for the upper wings. These should extend upwards and outwards. Pay attention to the general shape of a Monarch's upper wings, which are broader at the top and slightly rounded at the outer edge.
- Lower Wings: Below the upper wings, draw two slightly smaller, more rounded shapes for the lower wings. These typically have a more circular or slightly lobed appearance. Ensure that both sets of wings on each side are roughly the same size and shape to maintain symmetry.
Remember, these are still light sketch lines. Don't worry about perfection at this stage; focus on getting the general form and symmetry right. This butterfly sketch is made beautiful with the detailed butterfly wings drawing.
Step 3: Adding Detail to the Wings
Now comes the fun part: adding the intricate pattern that makes each butterfly unique. This is where your butterfly sketch is made beautiful with the detailed butterfly wings drawing.
- Wing Veins: Inside each wing, lightly draw lines that represent the wing veins. These usually radiate outwards from the body towards the edges of the wings. For a Monarch butterfly, these veins are quite prominent.
- Patterns and Markings: This is where you can truly bring your Monarch butterfly to life. Monarchs have distinctive black veins and borders, with orange in between. Along the outer edges of the wings, they have a band of black with small white spots. Start sketching these patterns lightly. You can also modify my method to draw any other butterfly by changing the wing patterns.
- Symmetry: As you add details, continuously check for symmetry. Whatever pattern you draw on one wing, try to replicate it as closely as possible on the corresponding wing on the other side. This creates a balanced and realistic appearance. Below you’ll find an easy step-by-step tutorial video for how to draw a Butterfly and a Butterfly Coloring Page. Great for drawing and coloring with symmetry.
Learning how to draw butterfly wings with an intricate pattern is a rewarding challenge that adds depth to your artwork.
Step 4: Refining the Outline and Erasing Guidelines
Once you're happy with the overall structure and the details of your butterfly, it's time to clean up your drawing.
- Darken the Outline: Go over your preferred lines with a slightly firmer pressure to make them stand out. This will be the final outline of your butterfly.
- Erase Guidelines: Carefully erase all the initial light sketch lines and any unnecessary marks. This will make your drawing look much cleaner and professional.
At this point, you'll have a clear and simple butterfly drawing, ready for the next step.
Step 5: Bringing it to Life with Color (Optional)
Adding color can transform your sketch into a vibrant piece of art. This step is entirely optional, but highly recommended if you want to explore the full beauty of a Monarch or any other butterfly.
- Choose Your Medium: Whether you prefer colored pencils, markers, or paints, select your preferred coloring tools.
- Apply Color: For a Monarch, fill in the main areas of the wings with orange, leaving the veins and outer borders black. Use white for the small spots on the black border. Experiment with shading to add depth and dimension.
- Details and Texture: Use lighter and darker shades of your chosen colors to create subtle variations and textures on the wings and body. This will make your butterfly look more realistic.
In this butterfly drawing tutorial, learn how to draw a monarch butterfly step by step with colored pencils and graphite. I break each step down so you can easily follow along, from drawing to coloring. This monarch butterfly drawing tutorial with simple steps was created in conjunction with my how to paint a butterfly step-by-step tutorial.
Beyond the Basics: Exploring Different Butterfly Styles
Once you've mastered the basic realistic butterfly drawing, you can explore various artistic styles. The "Data Kalimat" mentions several exciting variations on How To Draw A Butterfly – A Step By Step Guide:
- 1. Kawaii Butterfly Drawing: Focus on larger eyes, simplified shapes, and a generally cute, charming aesthetic.
- 2. Cute Butterfly Drawing: Similar to Kawaii, emphasizing endearing features and soft lines. Learn how to draw a cute butterfly in just 4 easy steps with this simple guide for kids. Easy art for beginners using basic shapes and imagination!
- 3. Cartoon Butterfly Drawing: Often involves bolder outlines, exaggerated features, and vibrant, flat colors.
- 4. Simple Butterfly Drawing: This is about distilling the butterfly down to its most essential shapes, perfect for very young children or quick sketches. In this step by step guide you will learn how to draw a simple butterfly using pencils and paper.
- 5. Butterfly Drawing From Letter X: A creative way to start, using the shape of the letter 'X' as a base for the wings, then building the butterfly around it. This is a fun exercise in seeing shapes differently!
Thankfully, even with more details, drawing a butterfly is still quite simple, especially if you break it down step by step. You can adapt the foundational steps learned here to achieve any of these styles.
Tips for Success and Continuous Improvement
Learning to draw is a journey, not a destination. Here are some tips to help you on your artistic path:
- Practice Regularly: The more you draw, the better you'll become. Even short drawing sessions can make a big difference.
- Don't Be Afraid to Make Mistakes: Every artist makes mistakes. They are part of the learning process. Use your eraser freely!
- Observe Real Butterflies: If possible, look at pictures or even real butterflies. Pay attention to their unique shapes, colors, and patterns. This observation will greatly enhance your drawings.
- Experiment with Tools: Try different types of pencils, papers, and coloring mediums. You might discover a new favorite!
- Seek More Resources: There are many resources available. Our free step-by-step lesson will show you how to draw a butterfly in just 9 EASY steps! Learn how to draw a butterfly in this step by step drawing tutorial for kids, teens and adults. While we covered the core steps here, remember that many resources offer slightly different approaches, and exploring them can be beneficial.
Follow along with us and learn how to draw a Monarch butterfly! Whether you’re a beginner or an experienced artist, learning how to draw a butterfly is a great way to improve your drawing skills and express creativity.
Final Thoughts
Drawing butterflies is a delightful and accessible artistic endeavor. By following these simple, step-by-step instructions, you've learned how to create a beautiful butterfly drawing, right from scratch. We started with basic shapes for the head, eyes, and antennae, then moved on to sketching the symmetrical wings, adding intricate patterns, and finally refining and coloring your masterpiece.
Whether you aimed for a detailed Monarch or a simple cartoon butterfly, the process is rewarding. This guide is great for beginners because it doesn’t require any specialized equipment, just your enthusiasm and a willingness to learn. Keep practicing, keep exploring different styles, and most importantly, keep having fun with your art!

How To Draw a Butterfly - Step-by-Step

Butterfly Flying Away Drawing
7 Ways Draw Butterfly
